
Variant Sets with Nested Animations in Actionscript
Modern Omniverse and OpenUSD pipelines demand more than static state changes—they require dynamic, user-driven animation that integrates with real-time UIs and automation. This tutorial shows how to embed animation logic directly into VariantSets using ActionGraphs, enabling smooth transitions, single-source UI generation, and scalable, reusable workflows. Automotive, manufacturing, and AEC teams can now drive complex state changes (like door open/close, equipment status, or lighting modes) with a single, maintainable graph—no more brittle scripts or duplicated logic.
Note: At Innoactive we implement the Voice control on the Apple Vision Pro (AVP) via the Variant Sets. Therefore functions / Actionscripts have to be made accessible via the Variant Sets.
By the end, you'll be able to:
Build robust, variant-driven animation systems
Integrate with Apple Vision Pro and other auto-generated UIs
Debug, validate, and adapt for any industry scenario
Table of Contents
Goal
Embedding a e.g. door-open/close animation in a VariantSet via an ActionGraph addresses four key objectives:
Single, Auto-Generated UI
In our System, the Apple Vision Pro builds its menus directly from OpenUSD VariantSets and ActionGraphs. By embedding the animation in the VariantSet via an ActionGraph, you avoid having separate menus for variants and for animations—yielding one clean, consolidated UI.
Smooth Transitions Beyond A ↔ B
VariantSets by themselves snap instantly between discrete states (e.g. fully open vs. fully closed). Pulling your animation curves into the VariantSet lets you play the intermediate motion, so flipping the variant both selects the end state and runs the corresponding opening/closing animation.
Clean, Reusable Workflow
Embedding your PushGraph animation in the VariantSet via an ActionGraph keeps your OpenUSD scene organized. You get unified variant-driven state management and real-time animated transitions—all controlled from a single VariantSet node.
ActionGraph Purpose & Apple Vision Pro Integration
The ActionGraph “grabs” the animation from the PushGraph, detaches it from the global timeline, and fires it when the VariantSet changes. This delivers smooth A→B animations (e.g. door open/close) and lets Apple Vision Pro auto-generate a single menu—streamlining your interface and user experience.
NOTES
Prerequisites | OpenUSD Layer composition, Basic ActionGraph knowledge, Animation fundamentals |
|---|---|
Time Investment | 90–120 minutes |
Special Sources | Omniverse docs, developer forum, industry case studies |
Warning | Ensure variable names match exactly between ActionGraph and PushGraph |
This actiongraph setup is based upon a thread from the developer forum:
https://forums.developer.nvidia.com/t/play-and-pause-of-animation-that-is-done-in-blender-and-imported-to-nvidia/253414In this thread a ‘Timeline node’ is being used. In our setup we decided to use the ‘count down’ node instead.
Learning Objectives
By completing this tutorial, you will be able to:
- Embed animations within OpenUSD VariantSets using ActionGraphs to create seamless state transitions
- Configure ActionGraph variables for tracking variant state changes and triggering animations
- Implement countdown-based timeline control to drive animation sequences independent of global timeline
- Create reusable animation frameworks that can be adapted for different variant sets and objects
- Integrate Apple Vision Pro menu generation through proper VariantSet and ActionGraph structure
- Debug and troubleshoot ActionGraph animation workflows using best practices
Intro Metadata
Level | Advanced |
|---|---|
Target Audience | Pipeline TDs, technical artists, engineers working with Omniverse/OpenUSD |
Sources | Omniverse docs, Pixar OpenUSD, project experience |
Tutorial Status | Production-Ready |
Version | 1.0 |
Tested With | KIT 105.1, OpenUSD 23.05 |
Difficulty | Advanced |
Quick-Start
If you would like to treat the damn graph as a BLACK BOX…, fine here you go, all you have to do is this:
One Graph per Variant Set
Duplicate this ActionGraph for each OpenUSD VariantSet you need to drive.
In GetVariantSelection, set Variant Set Name to your set (e.g. “LeftDoor”) and point Prim to the parent prim.
Declare Your ActionGraph Variables
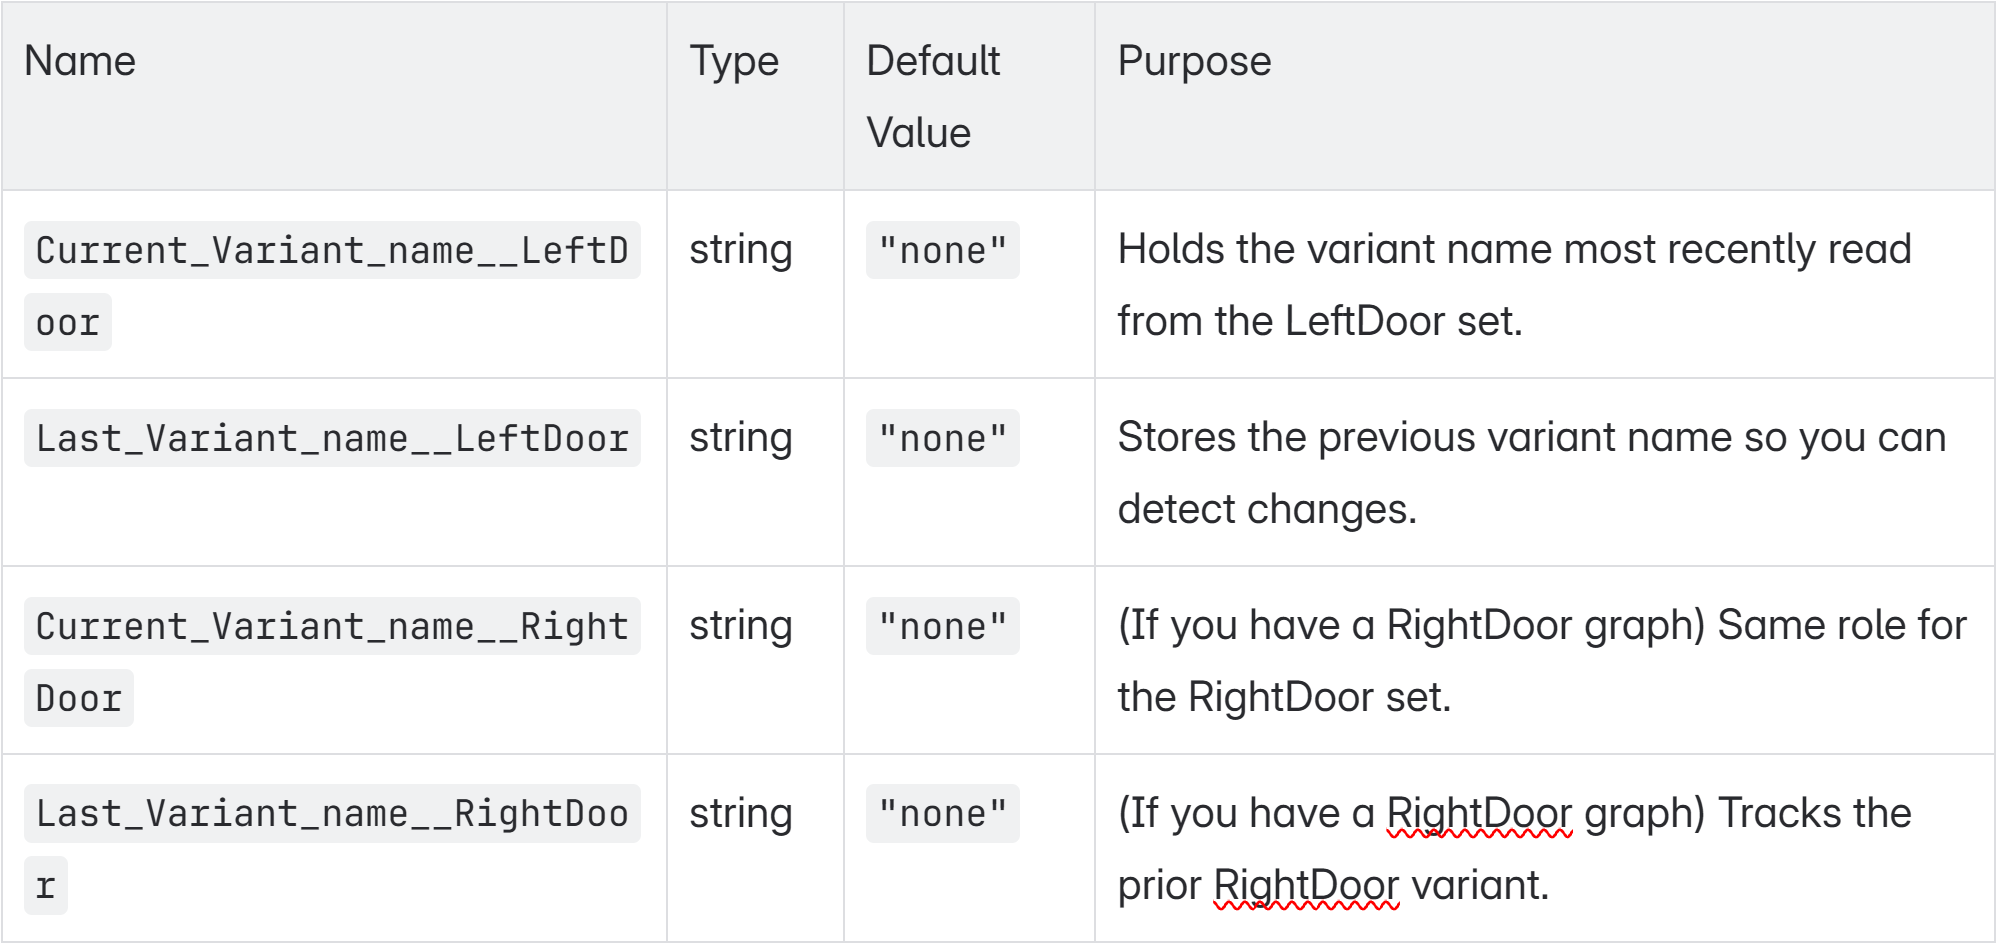
In the Variables panel, add two strings (default
"none"):Current_Variant_name__<YourSet>Last_Variant_name__<YourSet>
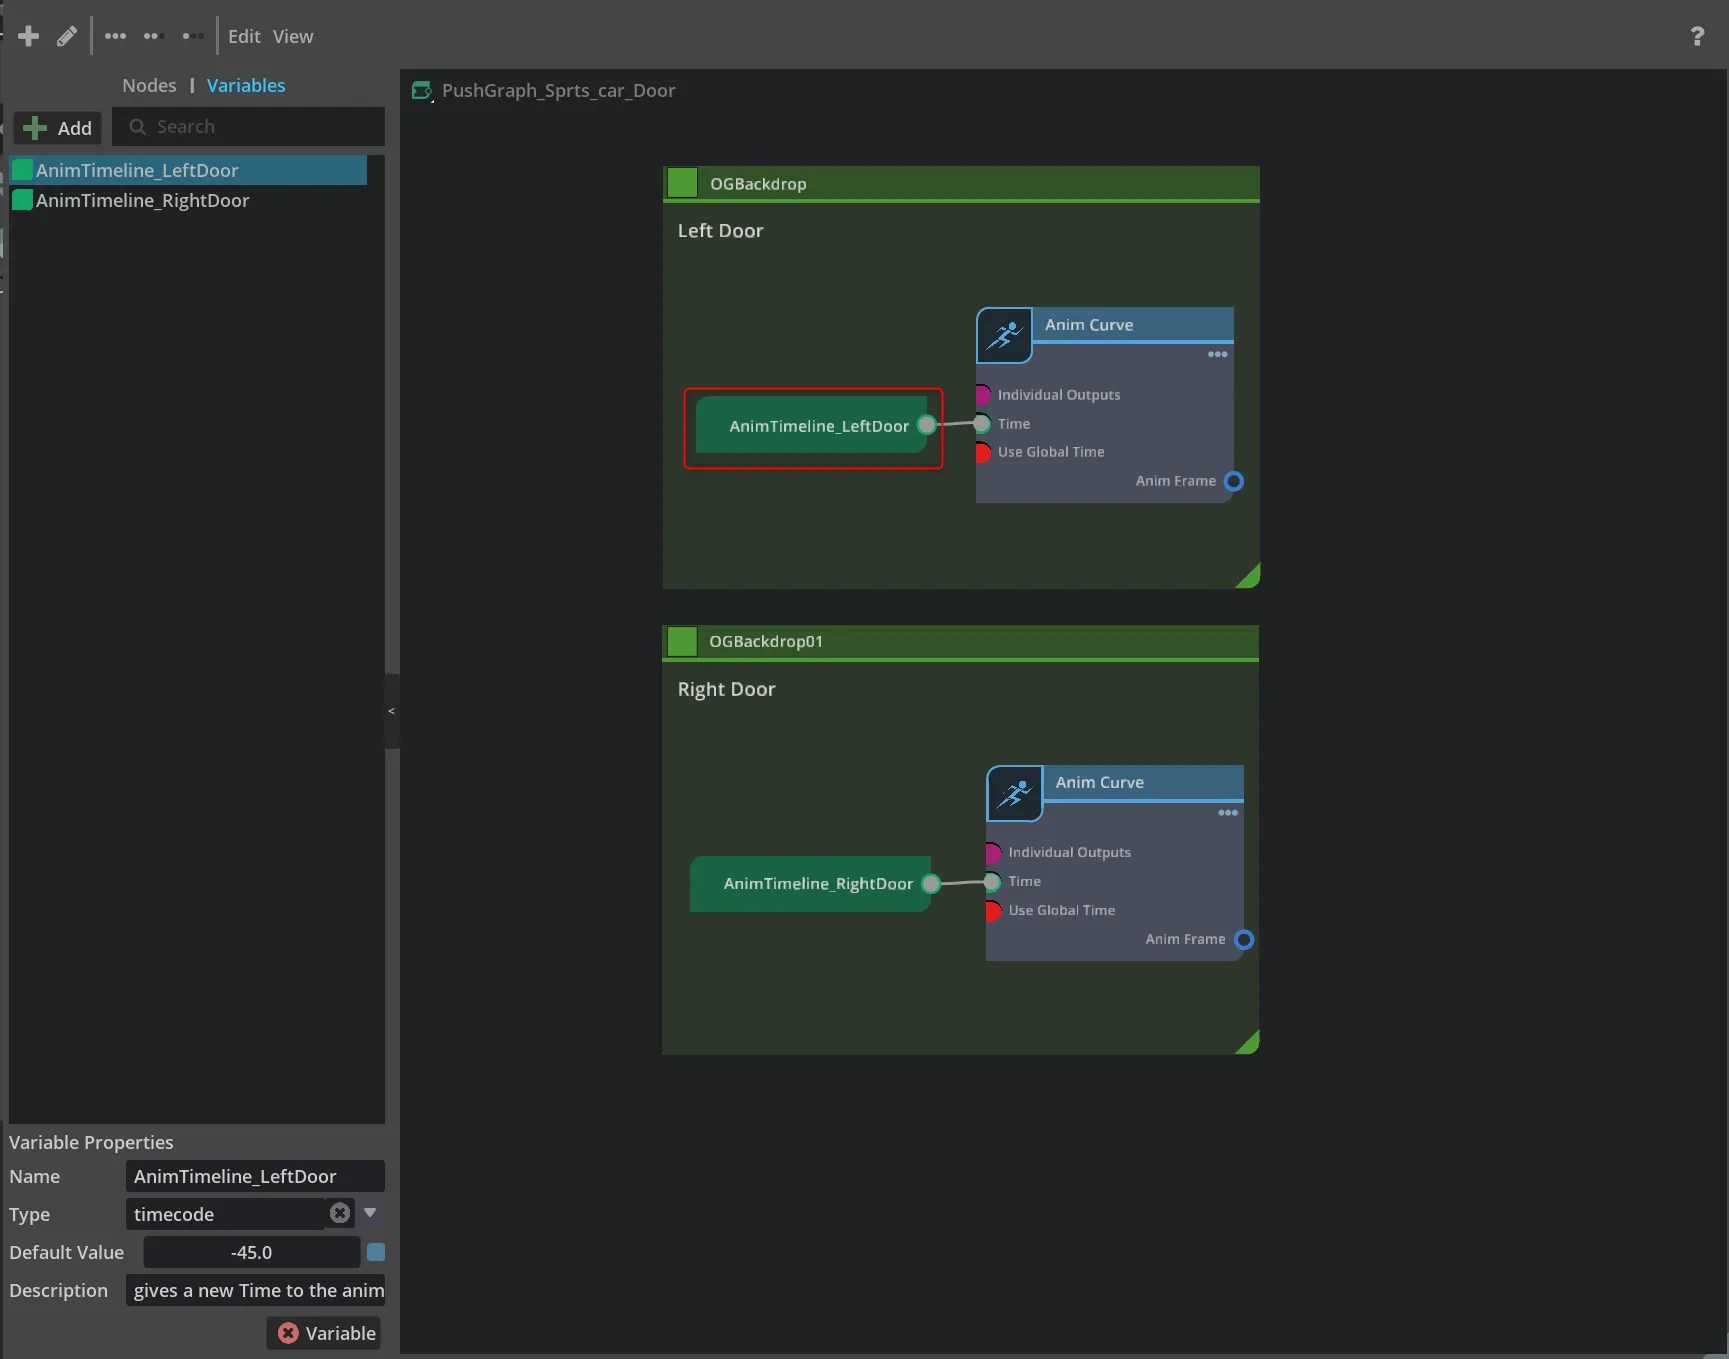
Declare Your PushGraph Variable
In your PushGraph, add a string or timecode variable (e.g.
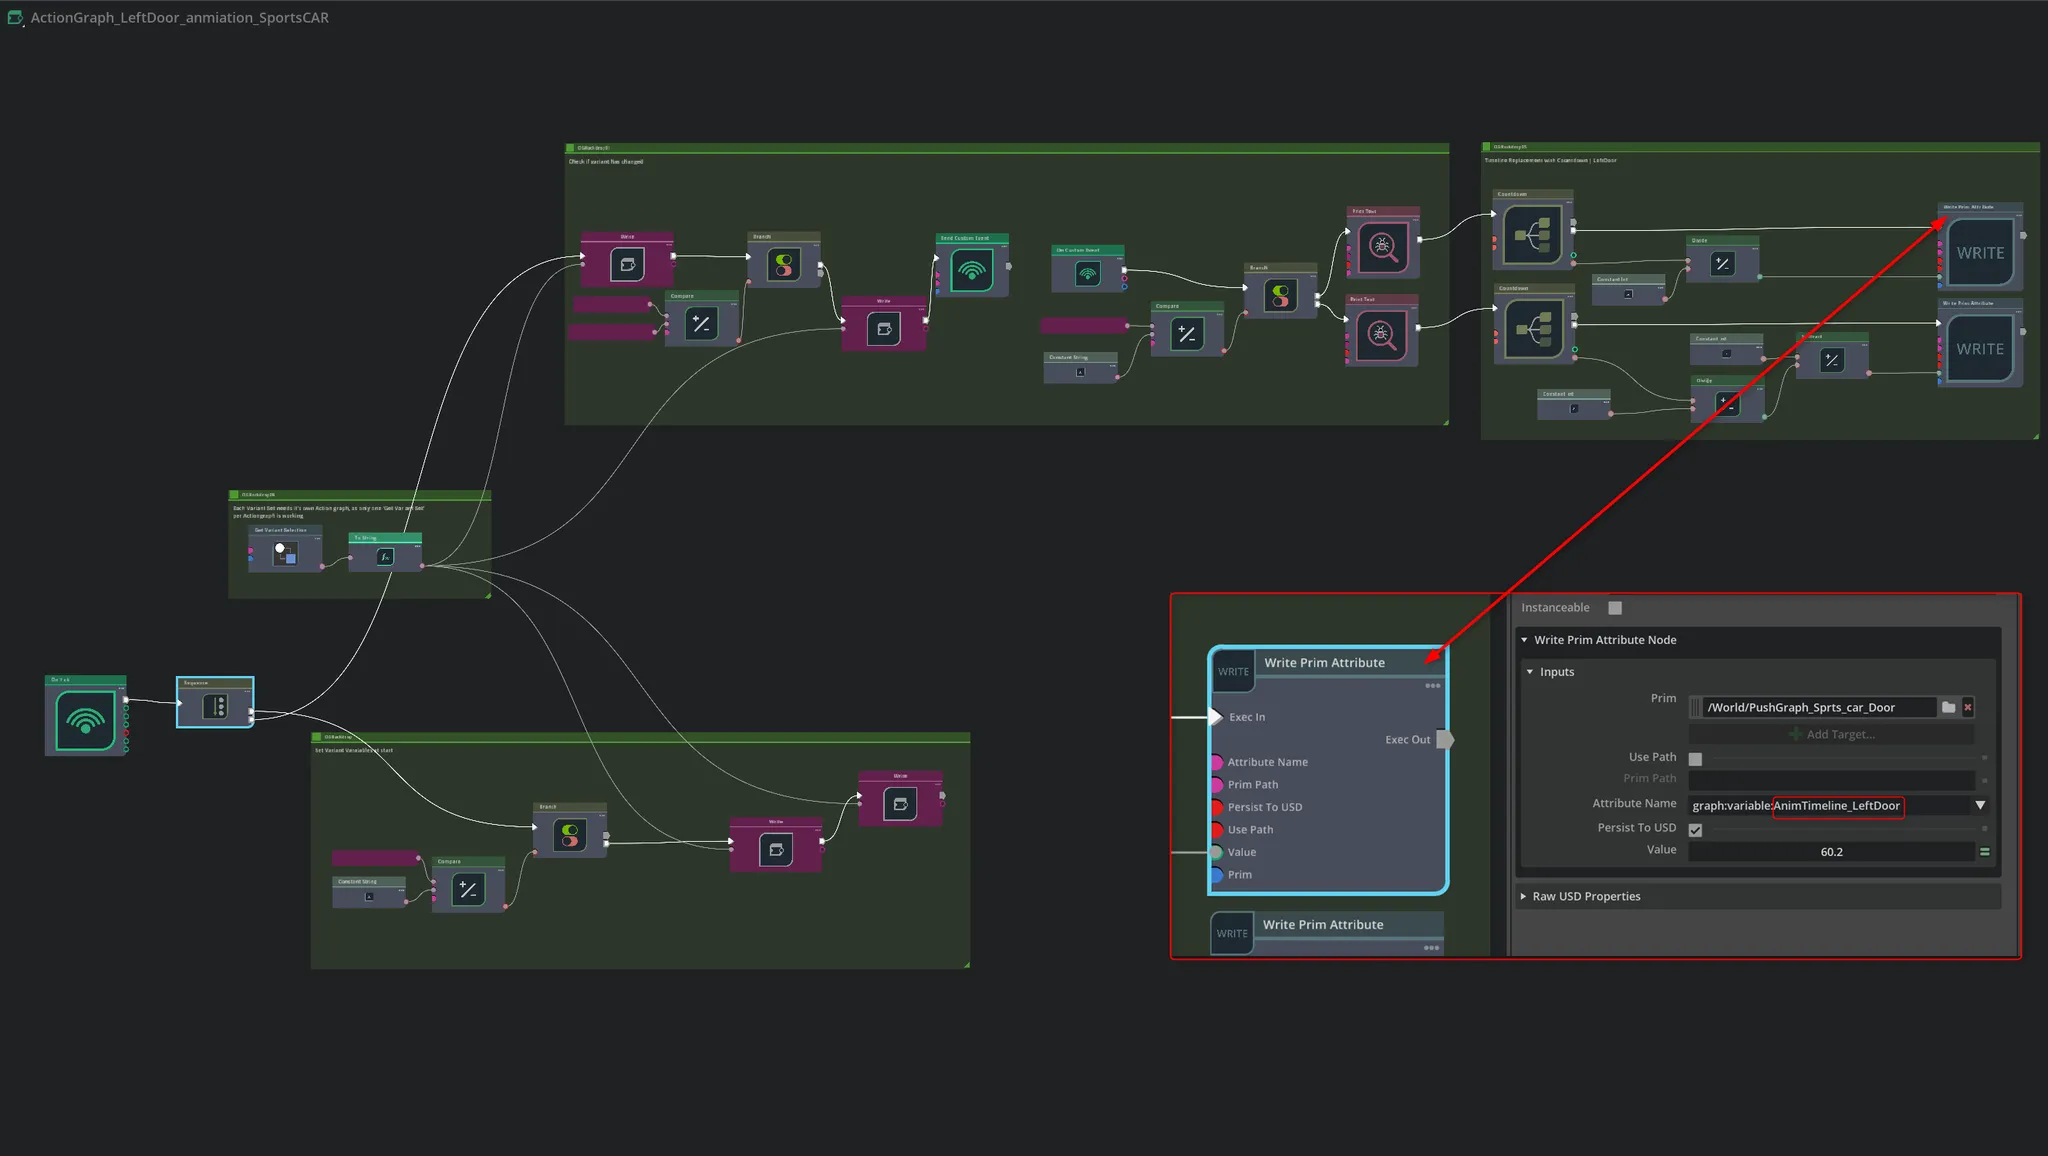
AnimTimeline__<YourSet>) to receive the driven timeline.Point the WritePrimAttribute Nodes
For each WritePrimAttribute, set Attribute Name to that push-graph variable (e.g.
"graph:variable:AnimTimeline__LeftDoor").Set Prim Path to the OpenUSD path of your target prim.
Configure Your Constants
Constant String nodes: enter your variant names (e.g.
"Open","Close") for compare branches.Constant Int nodes: set the countdown Duration (e.g.
300) and any divisor/inverter values to normalize or reverse your timeline.
With those five steps, the graph will:
→ Poll your VariantSet → detect changes → fire “TriggerAnimation” → run the countdown → write into your PushGraph variable → animate your prim.
DEEP DIVE Summary
This deep dive tutorial shows you how to wrap a dynamic animation inside a OpenUSD VariantSet using an Omniverse ActionGraph. You’ll learn how to:
Declare and seed graph-scoped variables for tracking current and previous variant names
Read the active variant from a VariantSet and detect when it changes
Fire a custom “TriggerAnimation” event on variant change
Use Countdown nodes plus simple arithmetic (Divide/Subtract) to generate a normalized (0→1) or reversed (1→0) timeline value
Write that timeline value into a PushGraph variable via WritePrimAttribute to drive your prim’s animation curve
Adapt the same structure for any other VariantSet or animation by re-configuring the variant name, countdown parameters, and attribute targets
Follow these steps once to set up each VariantSet, then flip your variant and watch your animation play smoothly between states.
General Overview
In the Stage you will find a ‘Push Graph’ and two Actiongraphs, one Actiongraph for each animation, as combining those into a single actiongraph caused issues, as only one 'Get Variant Set' per Actiongraph is working.
The push graph holds the animation In the animation curve note. In order to access the animation, a variable is created which in our case is called ‘AnimTimeline LeftDoor’. This‘AnimTimeline LeftDoor’ is being called at the end of the graph in the ‘Write Prim Attribute’ and triggers the animation.
This ActionGraph is a modular framework for triggering animated transitions from within variant sets—designed to go beyond static state changes (like simply switching between “open” and “closed”). It monitors variant selections and, using a combination of condition checks, countdown timers, and arithmetic nodes, dynamically drives the animation timeline of a target prim (for example, a door). Here’s a quick breakdown for reusing the graph for other animations:
Dynamic Variant Integration:
It reads the current variant state (via variant selection and variable read nodes) and compares it against expected values to detect when a change occurs.
Conditional Logic & Timing Control:
Branch nodes evaluate the change, and countdown nodes initiate a timed sequence. Arithmetic nodes (like divide and subtract) process these signals to compute the correct timeline values for the animation.
Event-Based Execution:
The graph uses on-tick events and custom event triggers (e.g., “TriggerAnimation”) to start and manage the animation sequence in real time, updating the scene’s animation attribute accordingly.
Reusability:
To adapt this ActionGraph for different animations, you can repurpose its structure by connecting your target variant set and modifying the countdown parameters or attribute write connections to fit the timing and controls of your new animation.
In essence, this ActionGraph provides a flexible, node-based system for integrating animated transitions into variant-driven workflows, making it straightforward to trigger complex animations based on state changes.
Detailed Overview | Step by Step
long Video
This ActionGraph is built to integrate dynamic animations within a variant framework in Omniverse. Instead of merely switching between static states (such as a door being “open” or “closed”), it triggers an animated transition. The graph is organized into several sections, each handling a specific part of the process. The purpose of the graph is to ‘grab’ the animation from the ‘push graph’, separate it from the ‘global timeline’ and trigger the animation on a certain event - in our case the change of state of a Variant set.
It is separated in six parts:
Before we start → Defining Variables
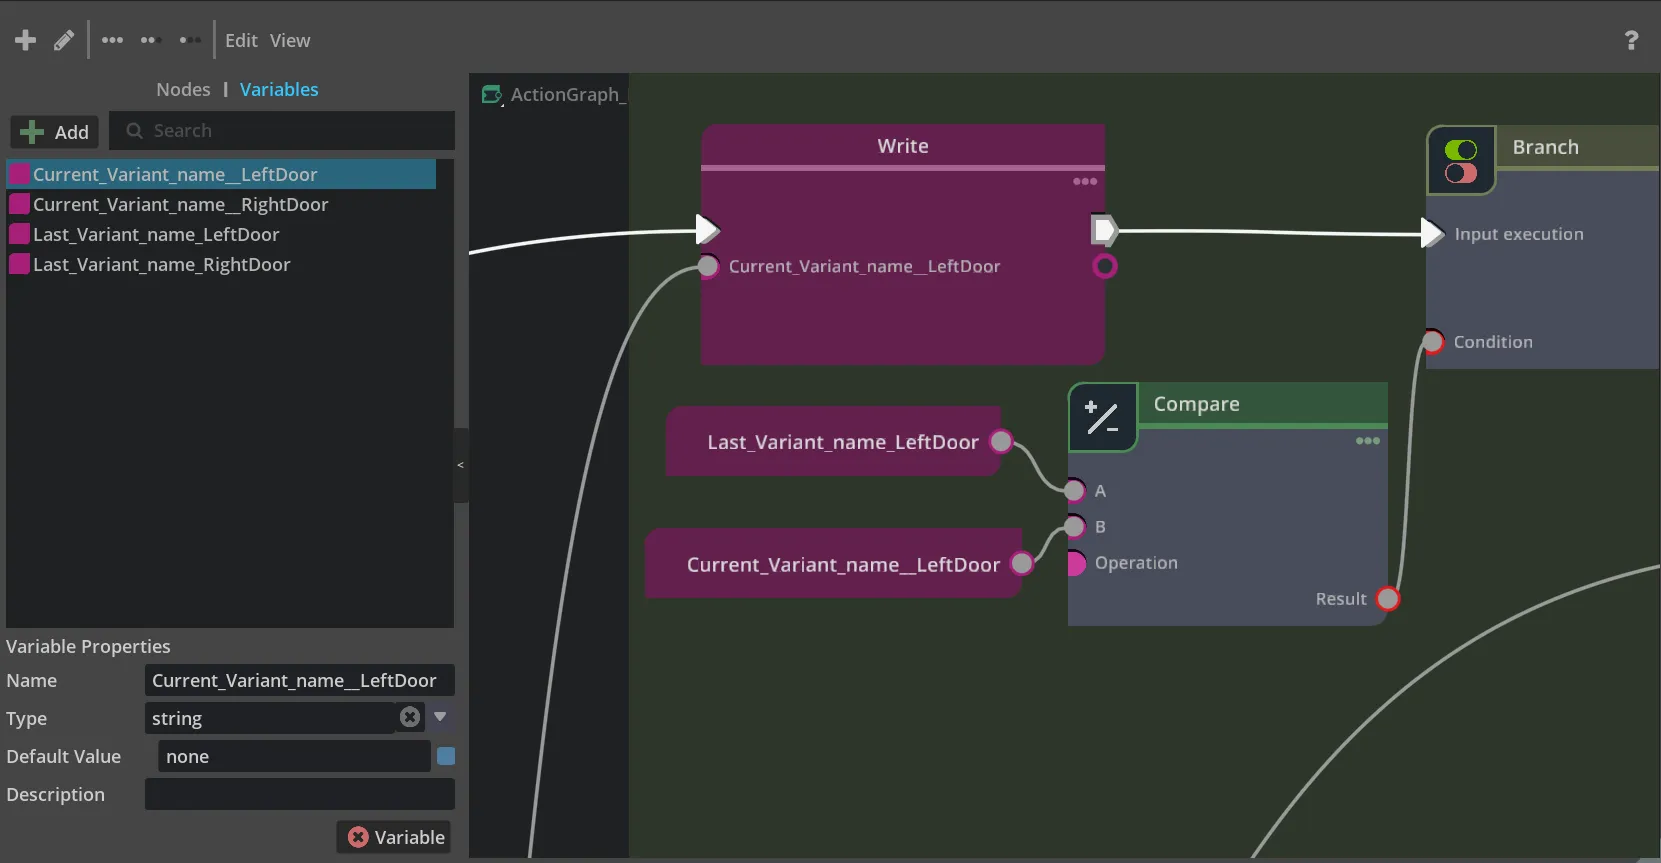
Before anything else runs, you need to declare four string variables in your ActionGraph’s Variables panel:
– Why they’re needed:
Current_Variant_name is overwritten each time you poll the variant set.
You compare it against Last_Variant_name to see if the user just switched variants.
On change, you update Last_Variant_name and fire your custom event to kick off the animation logic.
Make sure these variables exist (with exactly these names) before you wire up the “Check if variant has changed” block—otherwise your Compare and WriteVariable nodes won’t find the variables they need and nothing will trigger.
p.s. mind the Push Graph!
Remember to also define the variables in the push graph!! e.g. ‘AnimTimeline LeftDoor’, as defined here
Linking the graph to the time | It starts with the ‘On Tick’
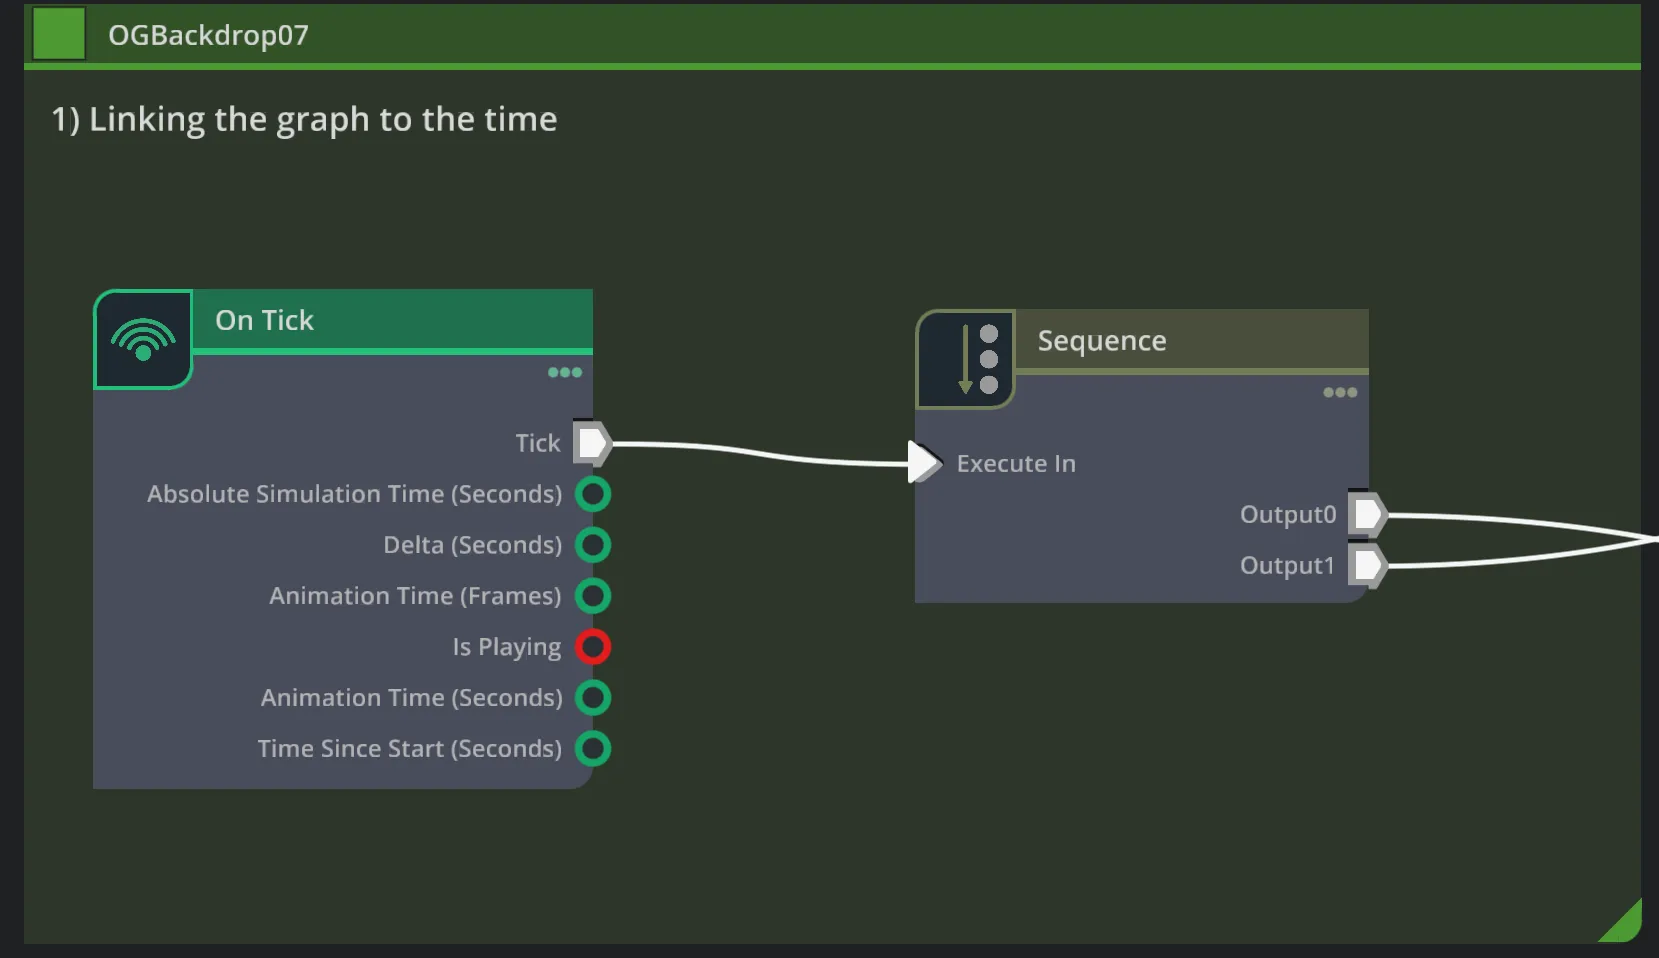
‘On Tick’ is telling the graph that it ‘knows’ time and that the Tick (→Time) is used for execution. The ‘sequence’ is taking the single Tick and sending it into two different parts of the graph.
execIn → Output0 → Output1 → Output0 → Output1 → …
Instead of firing both outputs every time, it steps through them in round-robin order.
On the first tick it fires Output0
On the second tick it fires Output1
On the third tick it fires Output0 again, and so on.
Why use it here?
It lets you interleave two chunks of logic on alternating frames.
In your graph, one branch of nodes runs on Output0 and a different branch runs on Output1.
This keeps them from executing all at once and lets you distribute work or avoid races between the two sides of your variant-check/write logic.
Defining what data is being used
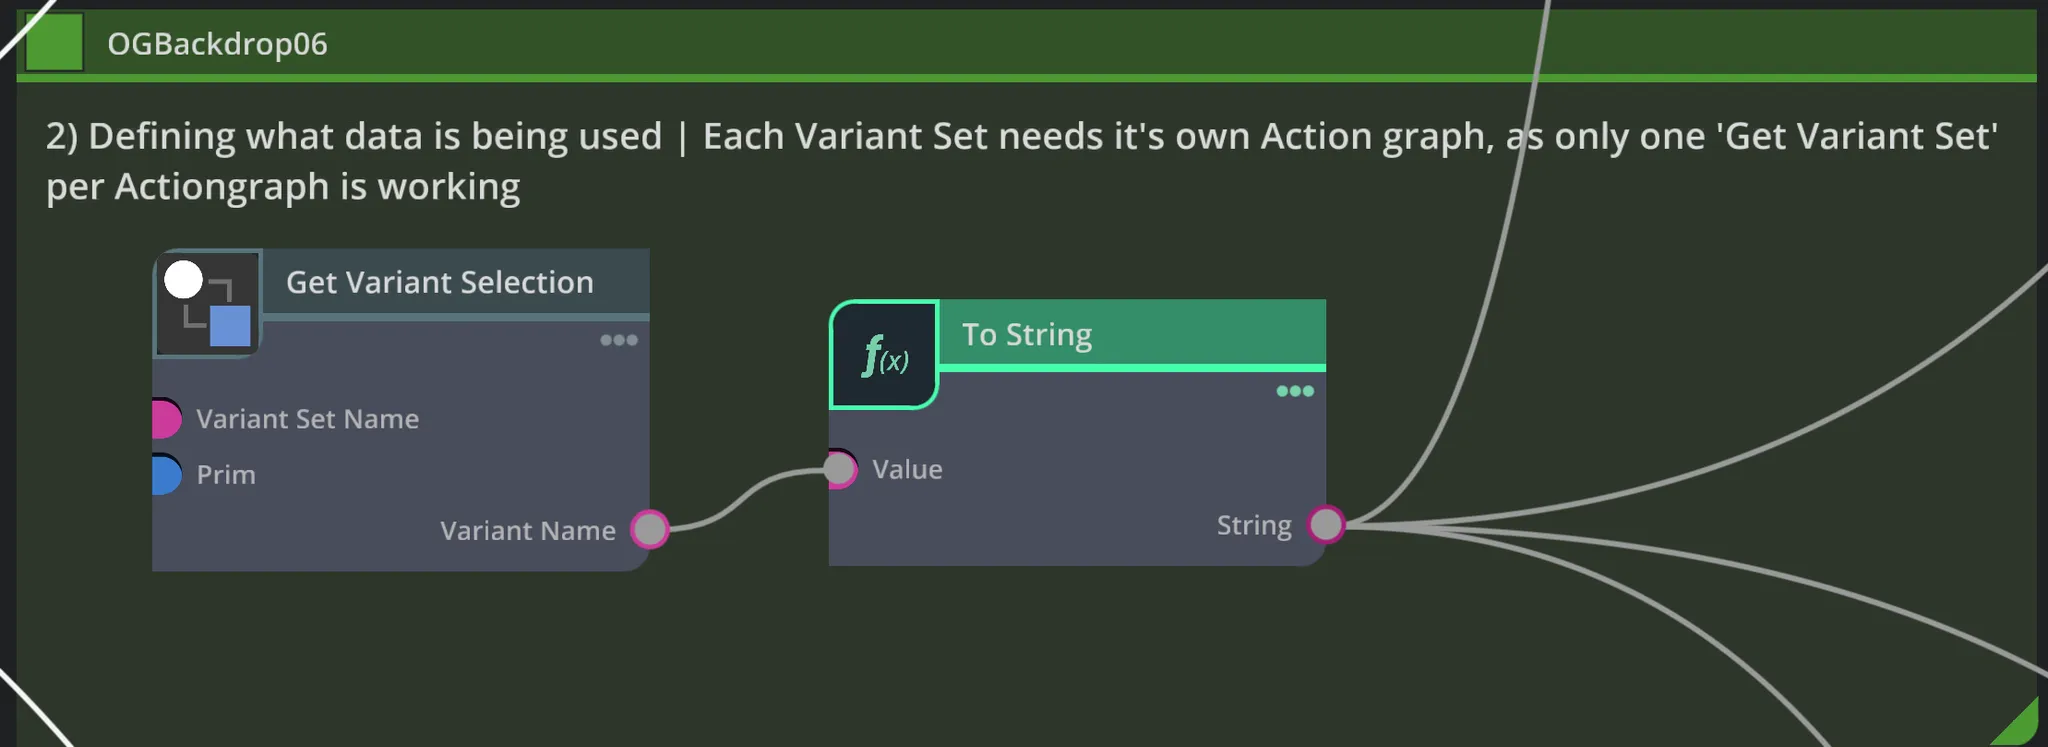
this little block is your entry point into the variant system. What it does is: Target Variant Set:
The node named
get_variant_selection_01retrieves the active variant from a variant set. Its inputvariantSetNameis set to a default value (for example, “LeftDoor”).Changing the target variant set is as simple as updating the
variantSetNameparameter on this node to match the name of your desired variant set.You should also update any variable names used in the read/write nodes if your new workflow requires different naming conventions.
Get Variant Selection
Queries the scene’s variant set (e.g. “LeftDoor”) on the target prim (in your graph it’s wired to
</World>or whatever prim you’ve specified).Outputs the current variant name as a token.
ToString
Converts that token into an actual string value.
This string then fans out to all the downstream nodes that need to know “which variant am I in right now?”
From here, those downstream nodes will compare this “current variant” string against your stored variables (like
Current_Variant_nameandLast_Variant_name), trigger branches, fire events, kick off countdowns, etc. So yes—the data coming out of this block is the very basis for everything that follows.Set Variant Variables at start
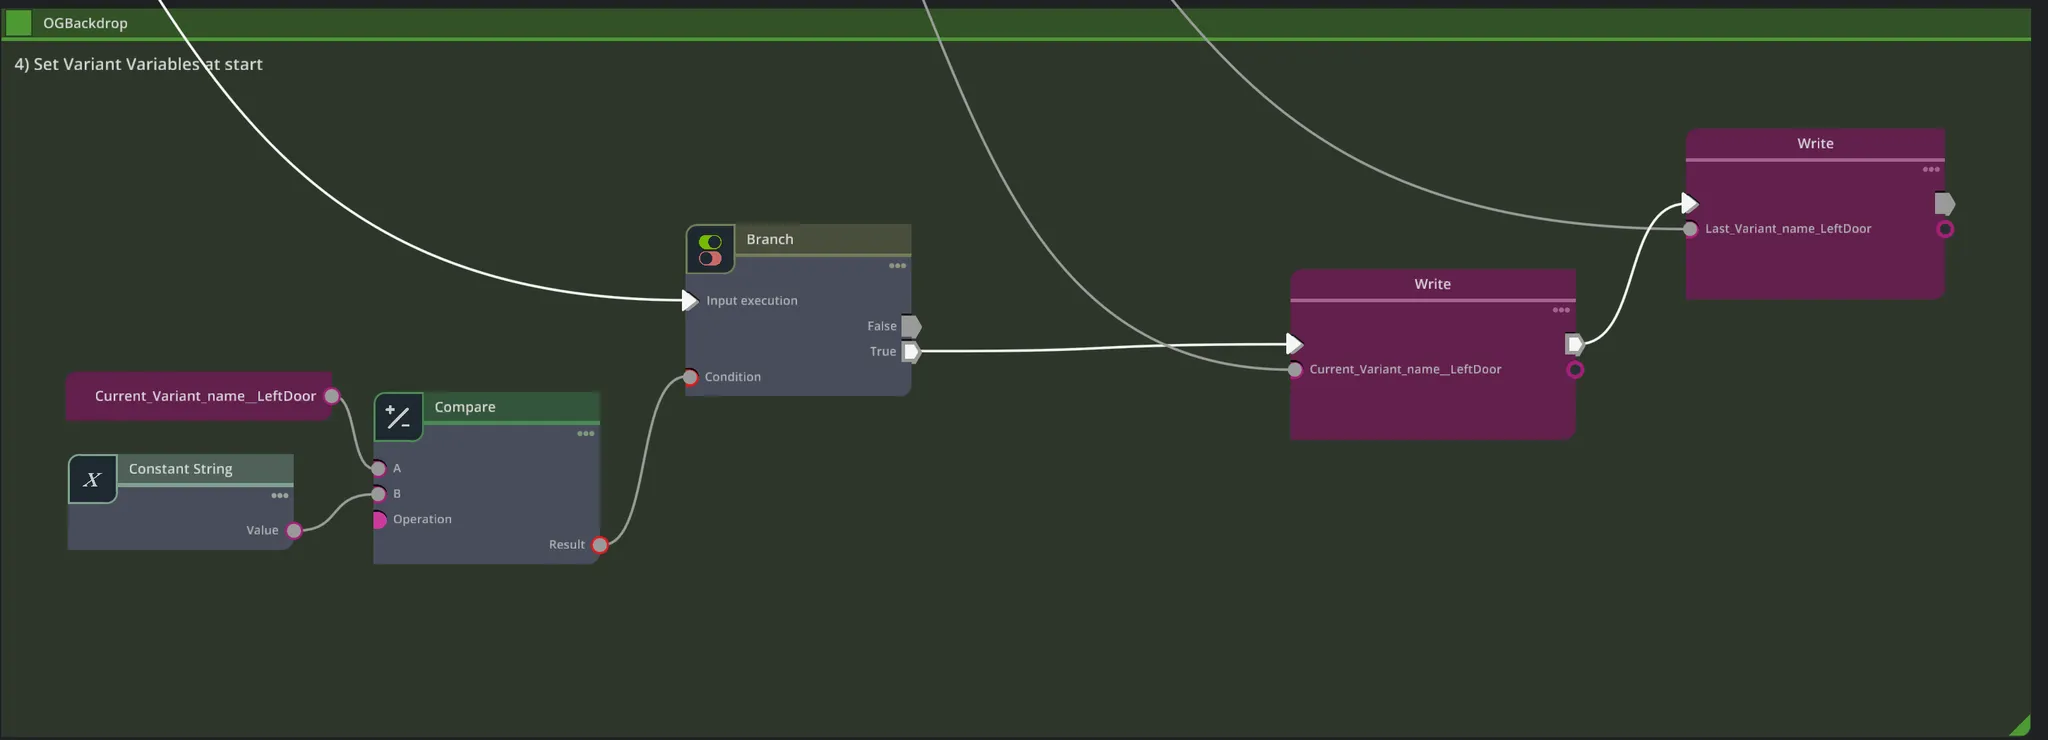
In plain English
This little “Set Variant Variables at start” block is there purely to seed your two graph-variables so that, the moment the graph kicks in, Current_Variant_name and Last_Variant_name both hold the real, just-read variant—and you don’t immediately trigger a “change” on tick 1.
Here’s how it works:
Compare Current Variant against the Default
Inputs
A:
Current_Variant_name__LeftDoor(this was just written by your GetVariantSelection→ToString block)B: a Constant String (typically set to
"none")
Operation:
!=(not equal)Result:
trueonly once, when the scene’s actual variant is something other than the default"none".
Branch on “Is it a real variant yet?”
execIn: wired from your Sequence (so it runs exactly once, on the frame you chose to initialise)
Condition: hooked to the Compare’s Result
False: skip—this handles the case where the variant system isn’t fully initialized and still reports
"none"True: go ahead and seed your variables
Write the Two Variables
First Write (magenta):
Exec In: from the True output of the Branch
Variable Name:
Current_Variant_name__LeftDoorValue: the live variant string you just read
Exec Out: feeds the second write
Second Write (magenta):
Exec In: from the first Write’s Exec Out
Variable Name:
Last_Variant_name__LeftDoorValue: the same live variant string
Because you update Last_Variant_name to exactly match Current_Variant_name on startup, your “Check if variant has changed” block (which looks for
Current != Last) won’t see a false-positive on frame 1. From here on, only actual user-driven variant switches will cause the change-detector to fire.
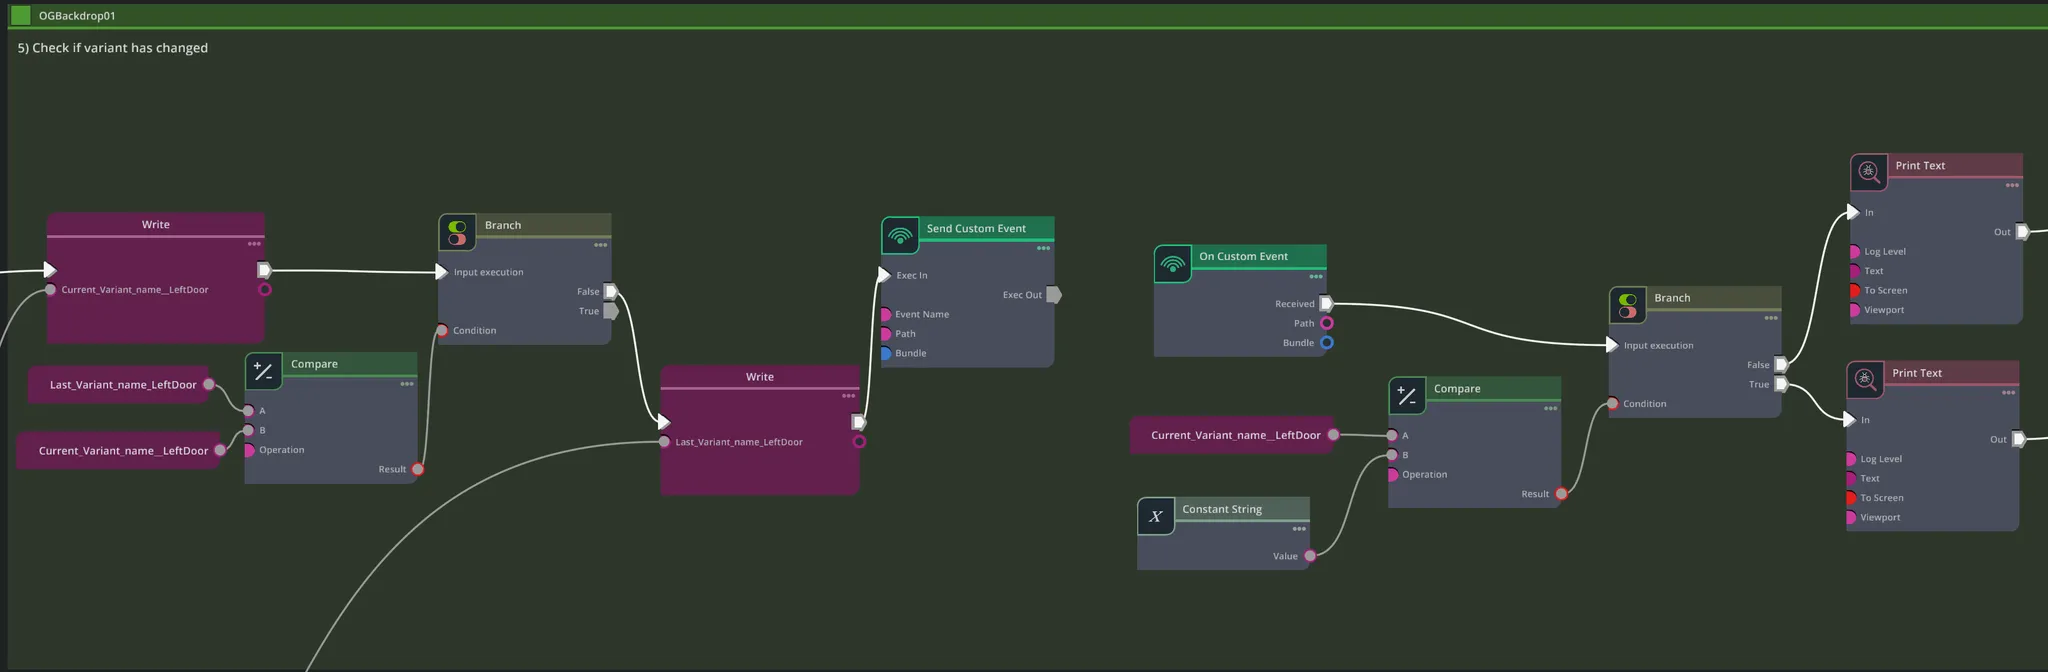
Check if variant has changed
In Plain English
Variant State Management:
The graph monitors which variant (or state) is currently selected using a dedicated node.
It uses read and write variable nodes to track the “Current_Variant_name” and “Last_Variant_name.” By comparing these, the graph detects when a variant change occurs.
Condition Evaluation and Branching:
Compare nodes are used to check if the current variant matches certain criteria or expected values.
Branch nodes then use these results to choose between execution paths (for instance, one branch may execute if an “Open” state is triggered, while another handles “Close”).
This structure ensures that the right animation sequence (or event trigger) is fired based on the variant's state.
Every other tick you overwrite your
Current_Variant_namevariable with whatever the user has selected.You immediately compare that against your stored
Last_Variant_name.If they differ, you know the variant just changed:
You update
Last_Variant_nameso you don’t repeatedly retrigger on the same variant.You fire a
"TriggerAnimation"event.
The graph picks up that event, re-checks which variant you just switched to, and prints either “Open” or “Close.”
That print step then hands off into your countdown + prim-attribute writing logic to actually drive the animation.
This block is purely about detecting a change in variant and branching on exactly which variant you switched to. Everything that actually animates the door comes after this.
Here’s what that middle “Check if variant has changed” section is doing, step by step (left-to-right):
Update the “Current_Variant_name” Variable
WriteVariable (magenta)
Exec In: hooked up to one of the Sequence outputs, so this runs every other tick.
Inputs:
graph→ your ActionGraph’s internal variable storevariableName→"Current_Variant_name"value→ the string coming out of your ToString node
Effect: stores the just-read variant name into a graph-scoped variable called
Current_Variant_name.
Compare to the “Last_Variant_name”
Compare (green)
Inputs:
A: the graph variable
Last_Variant_nameB: the freshly written
Current_Variant_nameOperation:
!=(not equal)
Output: a boolean
Resultthat is true exactly when the user’s selected variant has changed since the last check.
Branch on “Has Changed?”
Branch (olive)
Condition: hooked to that Compare’s
Result.execTrue: only fires when the variant actually changed this tick.
execFalse: does nothing (i.e. if they’re the same, we skip the rest).
On Change → Update “Last_Variant_name” & Fire Custom Event
When execTrue fires:
WriteVariable
Writes the new
Current_Variant_nameintoLast_Variant_nameso that next time you compare, you’re comparing against this updated value.
SendCustomEvent
Exec In: chained from that second WriteVariable, so it only fires after you’ve updated
Last_Variant_name.Event Name:
"TriggerAnimation"Effect: broadcasts a graph-wide custom event. Everything downstream that listens for
"TriggerAnimation"will now wake up.
Catch the Event & Decide “Open” vs. “Close”
OnCustomEvent (teal)
Listens for
"TriggerAnimation".Its
Exec Outgoes into another small Compare+Branch pair.
Compare
A: the up-to-date
Current_Variant_nameB: a Constant String (e.g.
"LeftDoor_Close")Operation:
==Result: true if the new variant is the “Close” variant.
Branch
True: you’ve switched to the Close variant → fires the lower PrintText node (which logs “Close”).
False: you’ve switched to some other variant (e.g. the “Open” variant) → fires the upper PrintText (which logs “Open”).
Print Text → Countdown (Open Path)
PrintText
This is the upper of the two pink “Print Text” nodes. It simply logs “Open” (or whatever you’ve configured) when the branch logic decides you’ve switched into the Open variant.
Its Out exec port feeds into the Exec In of the first Countdown node.
Countdown (upper)
Duration: how many ticks the countdown will run (default 300).
Period: how frequently the countdown ticks (default 1).
Outputs:
Tick (exec): fires once per period, for the number of durations
Tick Value (int): emits the current tick count (0 → Duration)
Alpha (float): normalized value 0→1 (not used here)
Trigger animation | LeftDoor

In Plain English
At the heart of the animation logic are two countdown nodes. Their role is to provide a dynamic timing mechanism for the animation:
Duration: Each countdown node has a
durationinput (set to 300 by default). This value determines the total count time or the overall length of the countdown.Period: The
periodinput, which is typically set to 1, defines how frequently the tick events are fired. This period regulates how the countdown progresses (think of it as the frequency at which the animation state is refreshed).
The tick outputs from the countdown nodes flow into arithmetic nodes (like Divide and Subtract) that process and normalize these values into time codes or timeline values.
Modifying Countdown Parameters:
To adjust how long an animation sequence should run, you can change the
durationon the countdown nodes. For a faster animation, you might reduce this value, or increase it for a slower transition.Similarly, modifying the
periodcan alter the granularity of the tick updates. A smaller period can lead to more frequent updates (useful for smoother animations), while a larger period might be used if less precision is needed.
Countdown → Divide → Write Prim Attribute (Open)
Tick (exec)
Routed directly into the Exec In of Write Prim Attribute (upper). This ensures the prim gets updated every tick.
Tick Value (int)
Routed into A of a Divide node.
Constant Int (upper)
Feeds B of that same Divide. This constant is typically set to the total duration (e.g. 300), so the divide outputs a normalized 0→1 timeline.
Divide → Result (float)
Connected to the Value input of the upper Write Prim Attribute node.
Write Prim Attribute (upper)
Attribute Name:
"graph:variable:AnimTimeline"(or whatever attribute your door’s animation listens to)Prim Path: the OpenUSD path to your left‐door prim (e.g.
/World/YourDoorPrim)Value: the normalized timeline (0→1) driving the animation
Exec Out: unused here, since this is the end of the Open path.
Print Text → Countdown (Close Path)
PrintText (lower)
Logs “Close” when you switch into the Close variant.
Its Out exec port feeds into the lower Countdown node.
Countdown (lower)
Same parameters (
Duration,Period) as the upper one, so Close uses its own countdown instance.
Countdown → Arithmetic → Write Prim Attribute (Close)
Tick Value (int) of lower countdown
Goes into the A of a Divide node (lower).
Constant Int (lower-left)
Feeds B of that Divide, again normalizing 0→1.
Divide → Result
Feeds into B of a Subtract node;
Constant Int (lower-right)
Feeds into A of that Subtract. If this constant equals 1, then A–B flips the timeline:
At tick 0:
1 – 0 = 1At tick max:
1 – 1 = 0
This produces a reversed timeline for the Close animation.
Subtract → Difference
Connects to the Value input of the lower Write Prim Attribute node.
Exec In (lower Write)
Wired from the lower countdown’s Tick (exec), so the prim updates each tick.
Write Prim Attribute (lower)
Same attribute and prim path as the upper one.
The Difference value drives the anim timeline in reverse, so the door goes from open→closed.
Why Two Separate Paths?
Open Path: normal 0→1 timeline (countdown node)
Close Path: reversed 1→0 timeline (countdown node)
By having two countdowns and two arithmetic chains, you keep the Open and Close animations decoupled. Each path writes the same prim attribute, but with values that progress forward or backward depending on which variant you selected.
How to Adapt the Graph for Other Animations
Changing the Target Variant Set
Update the Variant Selection Node:
Locate the node (e.g.,
get_variant_selection_01) that fetches the current variant.Change the
variantSetNameparameter to the name of the new variant set you want to control.
Adjust Variable Nodes:
Update the names in read (
ReadVariable) and write (WriteVariable) nodes if necessary. For example, if your new animation requires different state tracking, you may need to rename "Current_Variant_name" and "Last_Variant_name" to something more appropriate.
Reassign Scene Targets:
In the prim attribute writing nodes, update the target prim paths (or other related parameters) to point to the new scene object whose animation timeline you want to control.
Modifying Countdown Parameters
Adjusting Duration:
Find the countdown nodes (e.g., nodes named
"countdown"and"countdown_01").Change the
durationproperty to alter how long the countdown runs. A shorter duration will result in a quicker animation, while a longer duration will stretch the animation over a longer period.
Changing the Period:
Similarly, modify the
periodinput on the countdown nodes to control the frequency of tick outputs.A smaller period (say, setting it less than 1) means more frequent ticks, which can result in smoother or more granular animation updates.
Check Arithmetic Processing Nodes:
Ensure that any connected arithmetic nodes (like Divide or Subtract) are correctly calibrated for the new values. If you significantly change the duration or period, you might need to adjust the constant values used in these nodes to maintain the desired timing in your animation timeline.
Summary for Reuse
Purpose Recap:
The ActionGraph triggers an animation sequence within a variant framework by detecting variant changes, managing a countdown timer, and updating prim attributes in real time.
Customization Points:
Variant Set: Change the
variantSetNameon the variant selection node and update any related variables if needed.Countdown Timing: Modify the
durationandperiodinputs in the countdown nodes; adjust the arithmetic nodes if necessary to maintain proper synchronization.
General Workflow:
Variant selection is read and compared.
A condition is met, triggering the countdown sequence.
Countdown ticks are processed and used to update the animation timeline attribute of a prim.
Custom events and print messages provide feedback and ensure the system works as expected.
By following these steps, you can easily repurpose this ActionGraph to trigger different animations across other variant sets or objects in your scene, making it a flexible tool for dynamic animation workflows in Omniverse.
Validation and Testing
Why Validate?
Ensures ActionGraph triggers and variable updates work as expected
Prevents silent failures in animation playback
Catches naming mismatches and logic errors before deployment
Validation Steps:
Manual Test:
Switch variants in the Omniverse UI and observe animation playback
Confirm both "Open" and "Close" (or your custom states) trigger the correct animation
Variable Watch:
Use ActionGraph's variable inspector to monitor
Current_Variant_nameandLast_Variant_nameduring state changesEnsure variables update on every variant switch
Debug Print Nodes:
Add PrintText nodes after key branches to log which path is taken (e.g., "Open triggered", "Close triggered")
Edge Case Testing:
Rapidly switch between variants to check for missed triggers or race conditions
Test with multiple ActionGraphs in the same scene
Automated Checks (Optional):
Use Omniverse scripting to programmatically switch variants and assert expected animation state
Common Validation Issues:
Animation does not play: Check variable names and connections
Animation plays only once: Ensure countdown resets on every trigger
Wrong animation direction: Verify arithmetic node setup (Divide/Subtract)
Getting Started
Prerequisites Check
Before beginning this tutorial, ensure you have:
Software Requirements:
Omniverse Kit 105.1 or later
OpenUSD 23.05 or compatible version
ActionGraph extension enabled
Knowledge Prerequisites:
Basic understanding of OpenUSD VariantSets
Familiarity with ActionGraph interface
Understanding of animation curves and timelines
Asset Preparation:
OpenUSD scene with configured VariantSets
PushGraph containing animation curves
Target geometry for animation
Quick Setup Verification
Test VariantSet Access:
Open your OpenUSD scene
Verify VariantSets appear in Property panel
Confirm variant switching works manually
Verify ActionGraph Environment:
Open ActionGraph editor
Create new ActionGraph
Test basic node connections
Check Animation Assets:
Confirm PushGraph contains animation curves
Verify animation plays on global timeline
Test animation variable accessibility
Common Setup Issues
VariantSet Not Visible: Check OpenUSD layer composition and variant definitions
ActionGraph Errors: Verify ActionGraph extension is enabled and updated
Animation Not Playing: Confirm PushGraph variables are properly configured
Performance Optimization
Minimize Graph Complexity: Use one ActionGraph per VariantSet to avoid node conflicts
Optimize Countdown Duration: Set countdown duration to match animation length for smooth playback
Reduce Tick Period: For smoother animation, use a smaller period (e.g., 0.5 instead of 1)
Batch Variable Updates: Group related variable writes to minimize execution overhead
Profile with Omniverse Tools: Use built-in profiling to monitor graph execution and animation performance
Test on Target Hardware: Validate performance on Apple Vision Pro or other deployment platforms
Industry Adaptation
Manufacturing & Industrial Applications
Equipment State Visualization
Conveyor Systems: Use VariantSets for "Running/Stopped/Maintenance" states with smooth start/stop animations
Robotic Arms: Implement "Home/Working/Emergency" positions with realistic motion transitions
Assembly Lines: Create "Active/Idle/Fault" states with appropriate visual feedback animations
Implementation Pattern:
VariantSet: "EquipmentState"
├── Variant: "Operational" → Green status + smooth operation animation
├── Variant: "Maintenance" → Yellow status + pause animation
└── Variant: "Fault" → Red status + alert animation sequence
Automotive & Transportation
Vehicle Configuration
Door Systems: "Open/Closed/Ajar" states with realistic door swing animations
Lighting Systems: "Off/On/Hazard" modes with appropriate light sequences
Suspension States: "Normal/Sport/Comfort" with visual height adjustments
Architecture & Construction
Building Systems
HVAC Visualization: "Heating/Cooling/Off" states with airflow animations
Security Systems: "Armed/Disarmed/Alarm" with visual status indicators
Lighting Controls: "Day/Night/Emergency" modes with smooth transitions
Best Practices for Industrial Implementation
Naming Conventions: Use descriptive, industry-standard terminology
Follow
VSETS_EquipmentName_StateType.OpenUSDapattern [[memory:3285960]]Example:
VSETS_ConveyorBelt_OperationalStates.OpenUSDa
State Management: Implement proper state validation
Add safety interlocks between incompatible states
Include transition validation logic
Performance Optimization:
Use appropriate countdown durations for realistic equipment timing
Optimize for real-time visualization requirements
Best Practices
Always match variable names exactly between ActionGraph and PushGraph
Use separate ActionGraphs for each VariantSet to avoid logic conflicts
Document your graph structure with comments and PrintText nodes
Validate with manual and automated tests before deploying to production
Keep ActionGraphs modular for easier reuse and debugging
Profile performance on real hardware, not just in the editor
Update documentation as you adapt the graph for new use cases
Troubleshooting
Problem: Animation does not play
Check that all variable names match exactly
Ensure WritePrimAttribute nodes are connected to the correct prim and attribute
Verify that the countdown node resets on every trigger
Problem: Animation plays in reverse
Check arithmetic node setup (Subtract node should have constant 1 in input A)
Problem: Animation only plays once
Ensure the countdown node is properly reset on every variant change
Problem: ActionGraph errors or crashes
Check for duplicate variable names or node conflicts
Use PrintText nodes to debug execution flow
Problem: Performance is poor
Reduce node count and complexity
Profile with Omniverse tools and optimize countdown period
FAQ
General Questions
Q: Can I use this approach with multiple VariantSets simultaneously? A: Yes, but create separate ActionGraphs for each VariantSet. Combining multiple VariantSets in one ActionGraph can cause conflicts with the GetVariantSelection node.
Q: How do I adjust animation timing? A: Modify the Duration parameter in the Countdown nodes. Higher values create slower animations, lower values create faster transitions.
Q: Can this work with imported animations from other software? A: Yes, as long as the animation is properly imported into a PushGraph with accessible variables. The ActionGraph approach is animation-source agnostic.
Technical Troubleshooting
Q: My animation only plays once. How do I make it repeatable? A: The current setup is designed for state transitions, not looping. For repeatable animations, consider using different ActionGraph patterns or modify the countdown logic.
Q: Variables aren't updating properly. What's wrong? A: Check that variable names match exactly between ActionGraph and PushGraph. Ensure variables are declared in both graphs with correct types.
Q: Animation plays in reverse unexpectedly. How do I fix this? A: Check the arithmetic nodes in your "Close" path. The Subtract node should receive the constant value (1) in input A and the normalized timeline in input B.
Performance & Optimization
Q: How does this affect scene performance? A: The ActionGraph approach is generally efficient, but avoid creating unnecessary duplicate graphs. Performance impact is minimal for typical use cases.
Q: Can I optimize for mobile/VR platforms? A: Yes, consider reducing countdown duration precision and simplifying arithmetic operations for better performance on resource-constrained platforms.
Integration Questions
Q: Does this work with Apple Vision Pro automatically? A: Yes, when properly configured, Apple Vision Pro will auto-generate UI elements from VariantSets and ActionGraphs, creating a unified interface.
Q: How do I integrate with external control systems? A: You can trigger variant changes programmatically through OpenUSD APIs or Omniverse extensions, which will automatically trigger the ActionGraph animations.
Series Navigation
Previous: LIVRPS Debugging with IDE
Related Resources
Reference Guides
External Documentation
Official Documentation
Community Resources
Video Tutorials
ActionGraph Animation Samples Walkthrough - Introduction to ActionGraph concepts
VariantSet Animation Techniques - Advanced variant animation patterns
Apple Vision Pro Integration - VR/AR implementation techniques