
How to create and stream your own Kit app
The Innoactive extensions and the wrapper application are not yet publicly available.
Contact us at support@innoactive.de for early access.
Create a Custom Omniverse Application from Scratch
First up, we'll walk you through setting up your very own Omniverse app using the kit-app-template. After that, we'll dive into how to get it prepared and deployed to Innoactive Portal.
Before we jump in, make sure you:
Have a portal account that allows you to create and upload apps.
Know how to use command-line tools like
cmd.exeor PowerShell.This tutorial uses commands in the style of Powershell, with a leading
.\
Know how to clone a repository using Git.
Download repository and create your first application
If you already have a custom Omniverse application of your own, you can skip this part and head straight to the next section, Innoactive Extensions.
This section is just a quick start to get your first Omniverse app up and running. For a deeper dive, definitely check out the kit-app-template repository on GitHub and give the Kit SDK Companion Tutorial a read.
Start by cloning the kit-app-template repository:
POWERSHELLgit clone https://github.com/NVIDIA-Omniverse/kit-app-template.gitNow change into the new directory and run the repo tool:
POWERSHELLcd kit-app-template .\repo.bat template newUnless stated otherwise, all mentioned paths from here on are relative to the location of your cloned repository, e.g.
source\appsrefers toC:\Projects\kit-app-template\source\appsifC:\Projects\kit-app-templateis where you’ve cloned the repository.Follow the instructions on screen:
Choose to create an application.
Pick the OpenUSD Composer template.
Enter the file name, display name and version for your app and its setup extension
When it asks about application layers, select No.
Open the newly created .kit file, you can find it under
source\apps.Find the line that says:
YAMLcurrentPreset = “60x2”and delete it or comment it out:
YAML# currentPreset = “60x2”This is not strictly necessary, but it will improve performance while streaming.
Next, build the application:
POWERSHELL.\repo.bat buildAnd finally, launch the application:
POWERSHELL.\repo.bat launch
Congratulations, you have created your first Omniverse application!
Innoactive Extensions
The required Innoactive extensions are not yet publicly available.
Contact us at support@innoactive.de for early access.
Innoactive extensions are vital for robust Kit application streaming through the Innoactive Portal, especially for managing complex sessions outside of screen mode.
For instance, the innoactive.server.xr_mode extension automatically sets the correct streaming mode (VR, AR, or screen), crucial when manual configuration isn't feasible. Similarly, the innoactive.server.usd extension ensures the right OpenUSD file loads, vital in VR/AR sessions where users lack an in-headset UI.
Contact us at support@innoactive.de to get access to the extensions.
Let’s get started:
You should have received the extensions from us. Inside the .zip file is a folder with the name of the repository and in there are the extensions
Put the extensions into the
source\extensionsfolder of your Omniverse application
The extensions now should have a path like e.g.source\extensions\innoactive.server.
If you’ve extracted the .zip file here, make sure they are not in a subfolder like e.g.source\extensions\Innoactive-Server-Extensions-main\innoactive-server. This will not work. If that is the case, move the extensions to the right place and delete the now empty subfolder.Open your application kit file. You can find it in
source\apps. If you’ve been following the tutorial so far (and did not repeat any steps), your application should be the only .kit file in that folder.In your .kit file, find the [dependencies] section and add this line:
YAML”innoactive.server.bundle” = {}This is a bundle extension. It will make sure all other required dependencies are part of your application.
Build again:
CODE.\repo.bat buildThis will make sure the built application now contains the extensions we just added.
And finally, to see whether everything still works, launch again:
CODE.\repo.bat launch
The Innoactive extensions are now part of your application.
Wrapper Application
The required wrapper application is not yet publicly available.
Contact us at support@innoactive.de for early access.
The wrapper is the final piece of the puzzle. It will be the application that is launched during a streaming session and is itself responsible for launching your Omniverse application.
You should have received the wrapper application from us.
Extract its contents into the
_build\windows-x86_64\releasefolder, assuming you’ve previously built your application.
Keep in mind: if you create a clean build (.\repo.bat build -x) or otherwise delete your _build\ folder, you need to repeat step 2.
For that reason it is advisable to put the wrapper into its own folder (e.g. wrapper) and create a batch file or PowerShell script to copy its contents to the build folder.
Thats it, your application is now ready for packaging and deployment on Innoactive portal.
Deploy to Innoactive Portal
To automate this, read the article on CI/CD automation for Omniverse .
If you’ve made it this far, you should have a working Omniverse application including the Innoactive extensions and the wrapper.
The next steps are packaging your application as a single .zip file that can then be uploaded to Innoactive Portal. Finally we configure the app through the Control Panel and launch it.
Package application
Packaging your app will create a so called fat package that includes everything Omniverse needs to run. Make sure your app is built, and the wrapper is part of the build folder (_build\windows-x86_64\release).
Package your app:
CODE.\repo.bat packageThis will take a while.
When done, you can find your application package .zip file at _build\packages.
Upload application package
Login to your instance of Innoactive Portal
Click on your username, then click on Control Panel
On the Control Panel, click on Applications
Click on + Add Application and follow the instructions for uploading your application package.
Configure application on Innoactive Portal Control Panel
On the details page for your application we need to perform a few last steps before we can finally launch it.
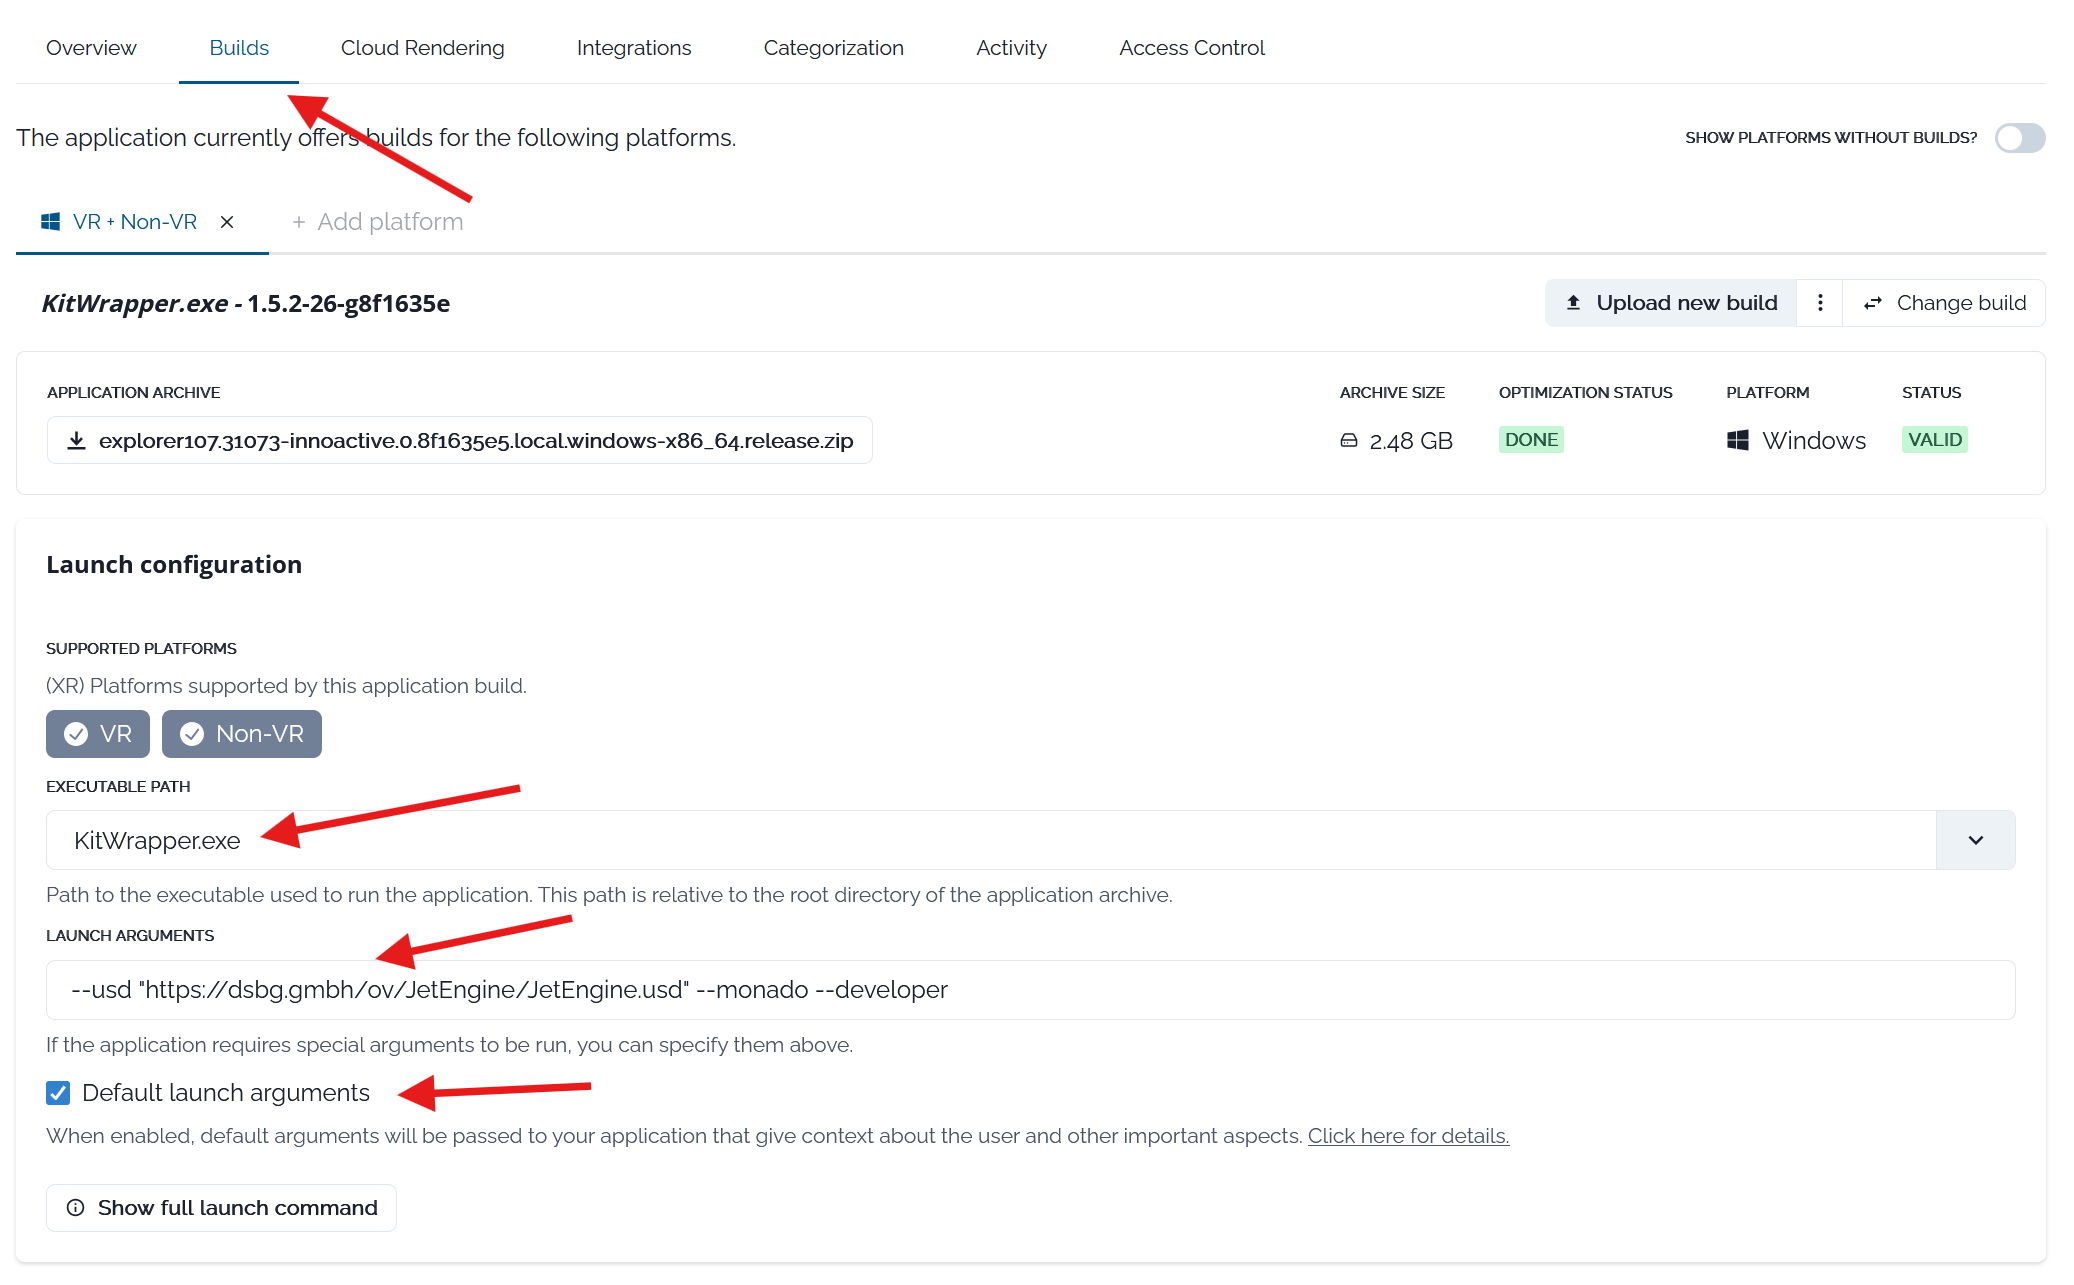
First, we configure the build itself, which can be found on the Build tab:
Executable Path:
KitWrapper.exeLaunch arguments:
--usd "https://dsbg.gmbh/ov/JetEngine/JetEngine.usd"You can exchange the
--usdto any OpenUSD file as long as its location is reachable from the VM that will run your application. Leaving it out will start your application with an empty stage.
Default launch arguments:
Checked
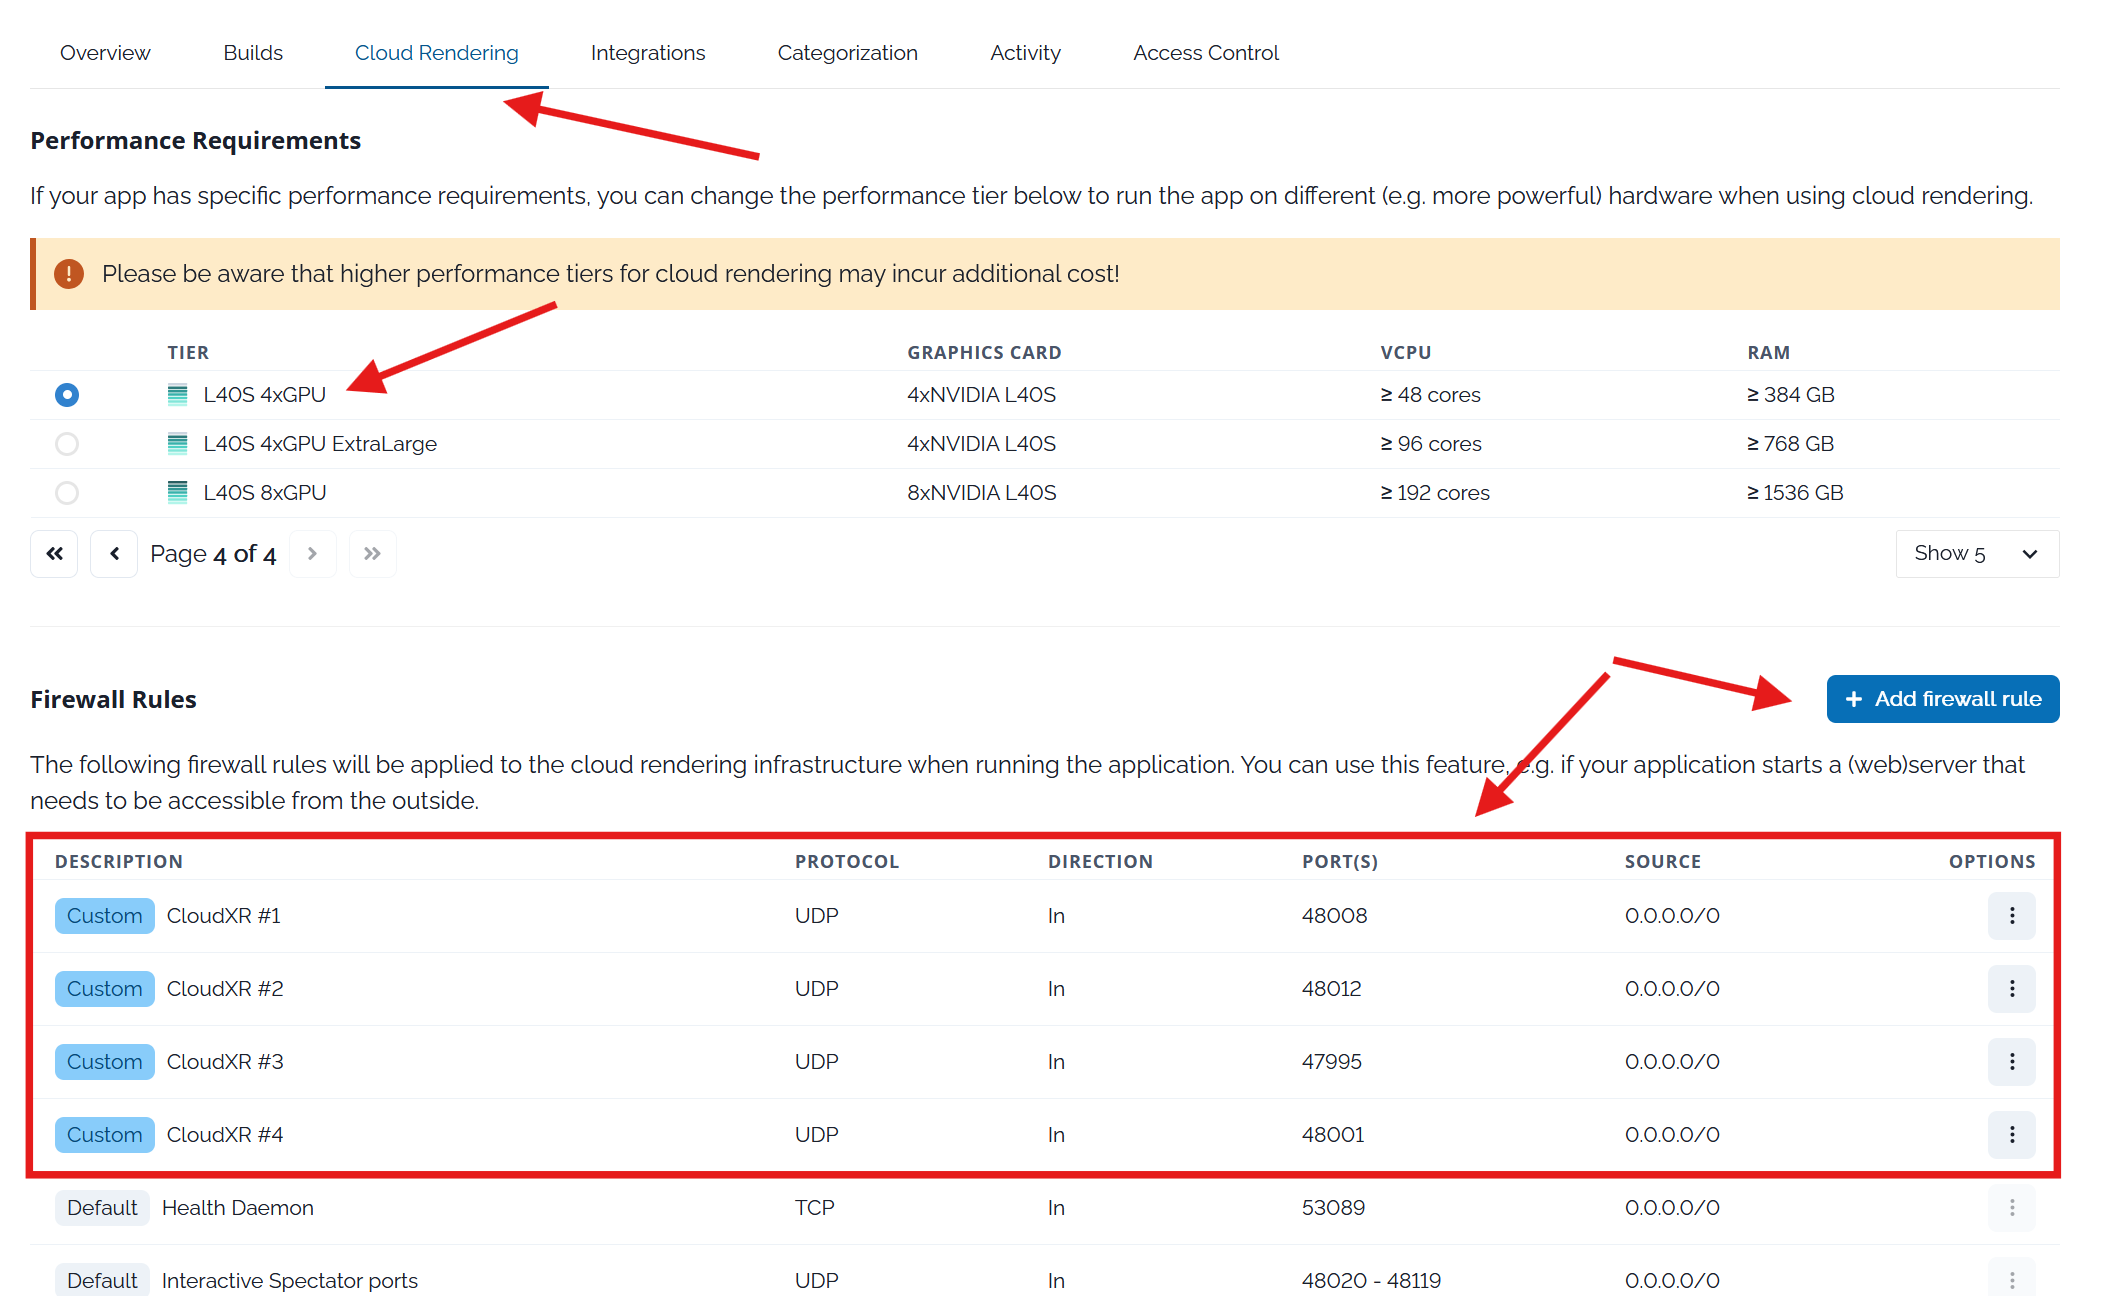
Next we switch over to the Cloud Rendering tab:
Under Performance Requirements select
L40S 4xGPUfrom the list.(AR/Apple Vision Pro only) Next to Firewall Rules use the + Add firewall rule button to add four additional rules:
Names: “CloudXR #1”, “CloudXR #2”, “CloudXR #3” and “CloudXR #4”
Protocol: UDP
Direction: Inbound
Ports: Single / 48008, 48012, 47995 and 48001
(Optional) Finally use the Access Control tab to give other people from your organization access to your application.
Congratulations, you’ve built and configured your own custom Omniverse application and are now ready to stream it!
For information on how to automate some of these steps (specifically the building and publishing to Portal), read How to create your own CI/CD pipeline (Omniverse example).